(This article was originally written as a guest article for a startup hobby website. That site is no longer in existence, so I have reposted the original article back to our site.)
Hello Homebrewers!
As recently as a decade ago, sour beers were a relatively obscure group of styles. The handful of examples on the commercial market were mostly Belgian imports with a few rare beers being produced locally by craft or home brewers. Back then, to say that a great deal of confusion existed regarding sour brewing techniques would have been an understatement. A swirling cloud of misunderstanding, myth, and fear may more accurately describe the sour brewing mindset at that time. Luckily, the times they are a changin’… and today, the sour brewing community is armed with more science, experience, and enthusiasm than ever before. Despite this, it still seems that many beginning homebrewers find themselves hesitant to attempt their first sour brews. If you fall into this group, and you’re ready to tumble down the sour brewing rabbit hole, then this guide is for you!
When I write for my own site, SourBeerBlog.com, I have developed a reputation for lengthy and very detailed articles, so I took the three-page format of this guide as a personal challenge! As this is a guide for beginning homebrewers, I will assume that you’ve got at least one or two batches of non-sour beer already under your belt. From that starting point, this guide will give you the recipes, techniques, and understanding that you will need to get your first sour beer from brew day to bottle. Let’s get started!
Just like yeast choice is what separates an ale from a lager, sour beers are defined by a special collection of yeast and bacteria that give them both their acidity and unique flavors. One of these yeasts, Saccharomyces (Sacc), is the same “Brewer’s Yeast” that you’ve already used for other beers. This yeast will create the majority of the alcohol in our sour beer. In addition to Sacc, we are going to add a new character, a bacteria called Lactobacillus (Lacto). These bacteria will produce the acidity in our sour beer. Lastly, we are going to introduce a third member into the fermentation, another family of yeast called Brettanomyces (Brett). It’s going to be Brett’s job to give the sour beer it’s unique aromas and flavors. These characteristics can range anywhere from yogurt or sourdough to things like lilacs, chocolate, candy, or tropical fruit. For your first sour beer we are going to avoid using another variety of bacteria that you may have heard of called Pediococcus. These colorful characters can be challenging to deal with and aren’t a requirement to make a delicious sour beer.
When using proper cleaning and sanitizing techniques, there is very little risk of infecting your “clean” batches of beer with these sour beer organisms. However, I do recommend segregating any plastic or rubber gear that comes in contact with these beers to be used exclusively for sour beers from that point forward. This typically includes plastic buckets, transfer hoses, bottling wands, rubber stoppers, and airlocks. Any equipment made of glass or stainless steel is easy to sanitize and can be used for both sour and clean beers without worry.
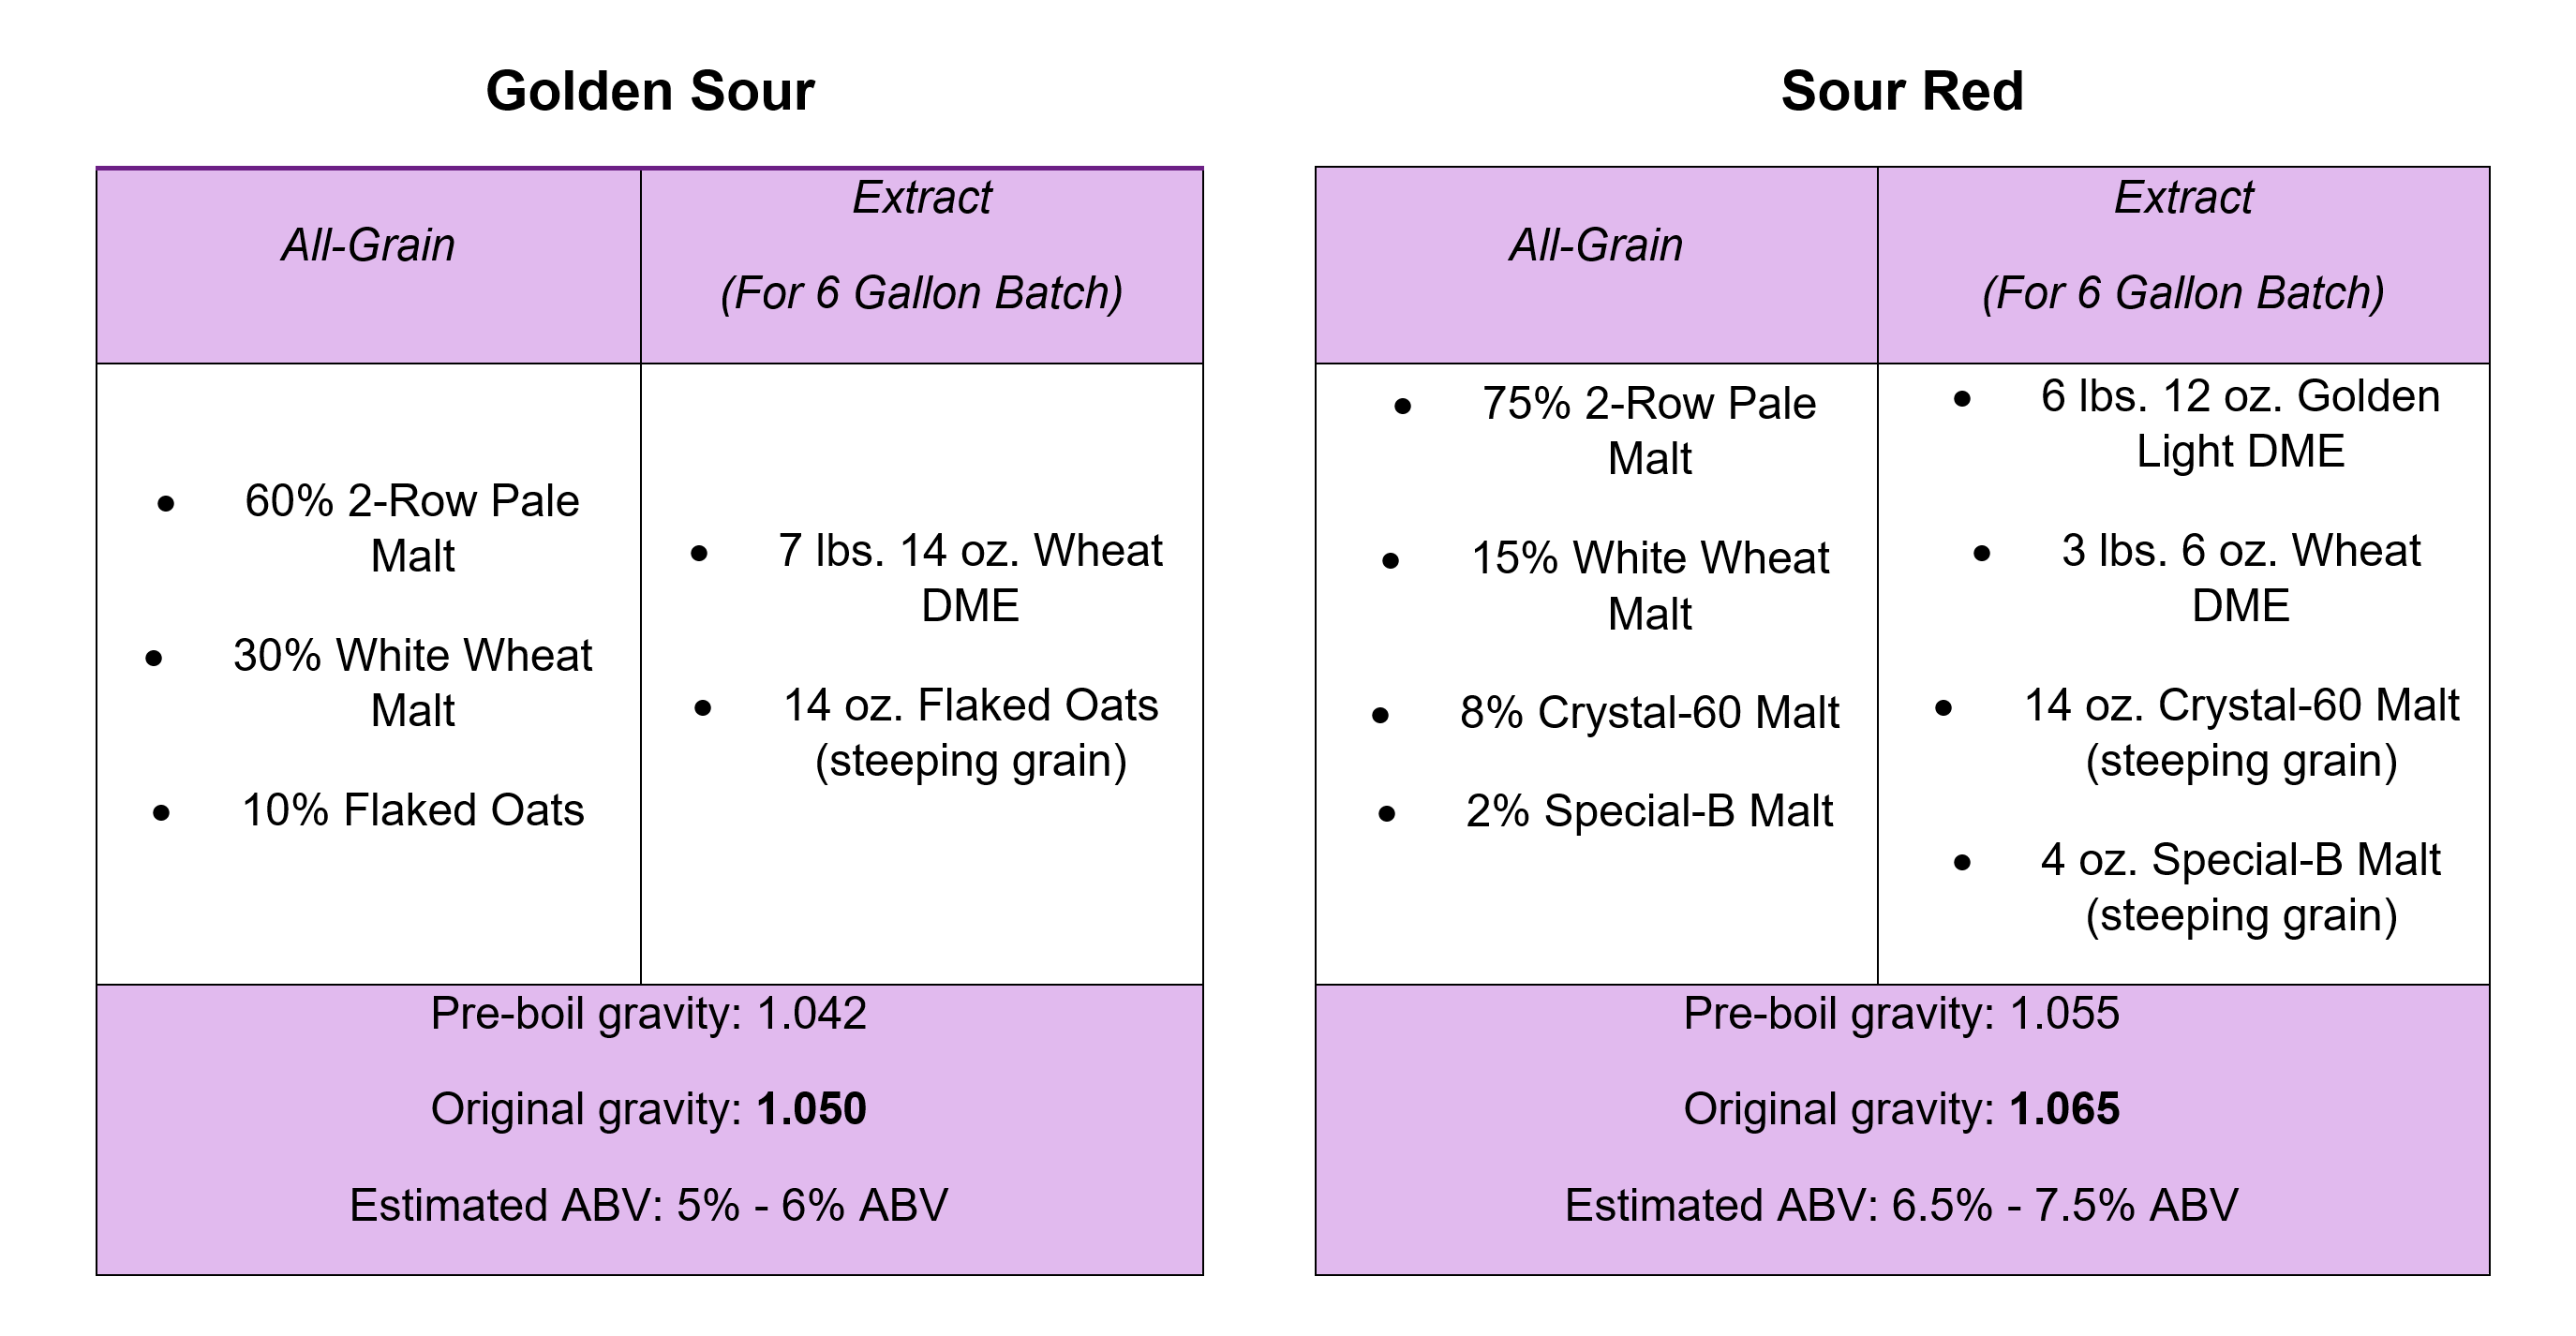
I’ve chosen two recipe options for this guide. One will create a classic golden sour and the second will produce a sour red ale. Regardless of whether you brew extract or all-grain, or use partial or full wort boils, you can make these sour beers. After your initial brew day, all other steps in the guide will apply equally regardless of your recipe choice:

If step mashing, target a protein rest at 130° F for 15 minutes then raise to a saccharification rest at 154° F. If infusion mashing, simply grain-in at 154° F and hold the mash for 60 minutes. If you’re worrying over a few degrees up or down, I will refer you to the sage advice of Charlie Papazian… Likewise, fly sparging, batch sparging, or brew-in-a-bag will all work equally well for these beers. Target the pre-boil gravities listed above but don’t get discouraged if any of the mash temps or pre-boil / post-boil numbers aren’t dead-on, the heart and soul of these beers are forged in fermentation.
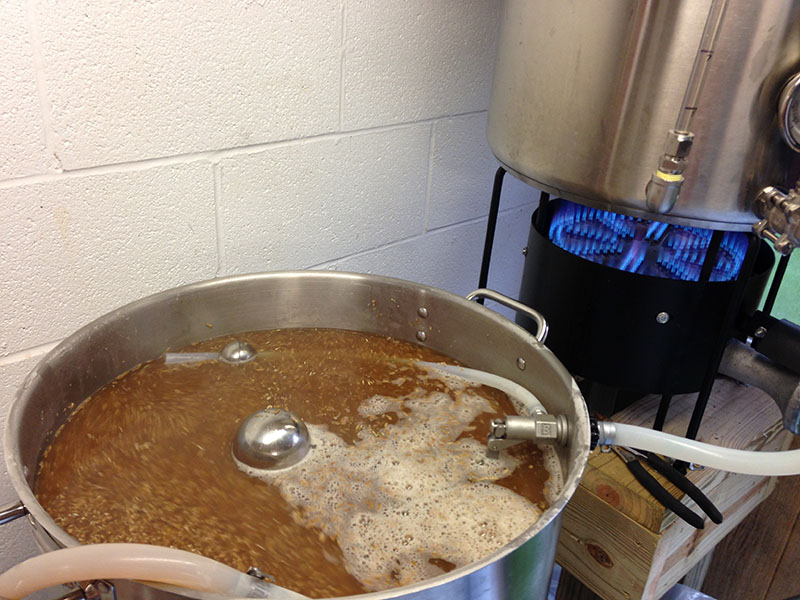
Give the wort a gentle rolling boil for 60 minutes, add Whirlfloc or other kettle finings 15 minutes before the end of the boil, then cool to 95° F. At this temperature, transfer the wort into the primary fermentation vessel of your choice. To this wort, add one of the following Lactobacillus options:
• One carton Goodbelly Probiotic Drink
• One package of Omega Yeast Lacto Blend (OYL-605)
• One package of Gigayeast Fast Souring Lacto (GB110)
Wrap your primary fermentation vessel in a sleeping bag or other insulating wrap, then let it slowly cool to room temperature over the next twelve hours or so. At this point, it will be time to oxygenate the wort and pitch our Saccharomyces. You can aerate the wort via vigorous shaking for 5 to 10 minutes or bubble pure oxygen into the wort for around a minute or so. Use of a sintered stone with filtered air or pure oxygen is also an option that helps get more oxygen into the wort.
After the wort reaches room temp and has been oxygenated, we are going to choose one of the following Saccharomyces strains:
• For a balance of fruity and funky character – White Labs WLP001 (California Ale Yeast)
• For a fruitier character – White Labs WLP007 (Dry English Ale)
• For a funkier character – White Labs WLP568 (Saison Blend)
Allow the beer to ferment until signs of active fermentation are complete. Now it’s time to taste a sample. At this point the beer may range in acidity from lightly tart to puckeringly sour. The beer may not taste particularly good right now but that is okay. It will get better! There are two specific flavors that we are looking to avoid, if either of the following are present, it’s best to dump the beer and try again:
1. A strong, unpleasant taste or smell of parmesan cheese, stinky feet, or rotten milk.
2. A strong, unpleasant taste of vomit or bile.
Don’t become discouraged if you have to dump a batch, any sour brewer worth their salt has to dump batches from time to time!
As long as things are tasting alright (or at least not too bad), then we are ready to move forward. From this point onwards, we are going to avoid any oxygen exposure if possible. We will now transfer the beer from its primary fermentation vessel into a sanitized 5 gallon carboy. The goal will be to add our final microbe, Brettanomyces, and fill the carboy up to the neck with beer so that a minimal surface area touches the air (this helps reduce oxygen exposure).
When it comes to choosing a Brettanomyces strain or blend, you have a variety of options. Here are a few strains that I think work very well:
• White Labs WLP650 Brettanomyces bruxellensis (Fruity & Funky)
• White Labs WLP653 Brettanomyces bruxellensis ‘lambicus’ (Barnyard & Haylike)
• East Coast Yeast ECY34 ‘Dirty Dozen’ Brett Blend (Earthy, Sweaty, Animalistic Funk)
• The Yeast Bay ‘Amalgamation’ Brett Blend (Tropical Fruits)
Once you pitch your Brett and fill up the carboy, the only thing you have to do now is wait and keep the airlock topped up. I would recommend visually checking in on the beer from time to time. You may or may not notice a pellicle (white surface film) form when the carboy is full and this is totally okay. It’s normal after a few weeks to a month or so to notice tiny bubbles rising in the aging beer. This is a sign that the Brettanomyces is active and continuing to ferment some of the sugars that Saccharomyces couldn’t tackle. As long as you see these tiny bubbles rising, I would avoid sampling the beer.
When these bubbles stop forming and the beer begins to look darker in color, this is a sign that the Brett is starting to drop out of suspension and the beer is becoming clearer. If you notice the beer become clear like this, or about 3 to 6 months have passed since you pitched the Brett, it’s time to sample the beer. Pull a sample from the carboy with a wine thief to measure the specific gravity and taste the beer. After pulling a sample, it is best to flush the headspace of the carboy with carbon dioxide before sealing it back up.
It’s worthwhile mentioning that sour beer fermentations can be unpredictable and that’s where the importance of tasting and aging these beers comes into play. If the sample is tasting great, then at this point it’s fine to keg, carbonate, and serve the beer. If you would like to bottle the beer we will add one extra step: You’re going to check the gravity today, and then check it again in 4 to 6 weeks. If the numbers are the same, go ahead and bottle your new sour beer just like any other. However, if in six weeks the gravity has dropped a little further, then you need to re-test every 4 to 6 weeks onward and wait for it to stop lowering before attempting to bottle the beer. It is best to always use bottles designed for Belgian beers or champagne when bottle conditioning sour beers. The presence of Brettanomyces makes these beers easier to over-carbonate. If you find yourself missing the hop presence of many other beer styles, go ahead and dry-hop either of these recipes, dry hopped sour beers are delicious!
If your beer isn’t tasting sour enough, isn’t very characterful, or has some strange flavors that you haven’t tasted in commercial sours, don’t worry! The beauty of beers like these is their ability to continue to mature and develop for up to a couple of years. Simply let it age, keeping the airlock topped off, and check in on it every couple of months. Some of the most delicious sour beers that I’ve ever made have gone through periods of time when they tasted pretty poor early on.
That wraps up my guide to brewing your first sour beer, and in just under 3 pages! I hope that this guide was educational, reassuring, and easy to follow. With a few basic recipes and the ability to mix and match strains, the advice in this guide alone can produce well over 50 different sour beer variations! Have fun brewing your first sour beer and if the sour bug bites you, come visit me at SourBeerBlog.com to learn more.
Cheers!
Matt “Dr. Lambic” Miller


